Image search for Travel Agency blog in Sitefinity
Artificial intelligence becomes more and more part of our everyday life. In fact it's all around us - the camera of our smartphone, the recommended products in the online shop, suggested ads in social media, etc.Use case:
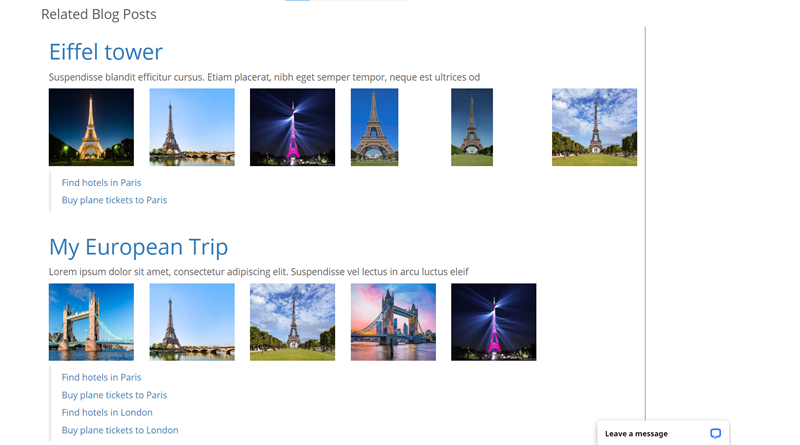
Our travel agency has a blog where trips to different places and landmarks are posted. Each blog post has title, summary, description, tags with the nearest cities and a media gallery with images from the travel.We're creating an image search engine where a user will be able to upload an image of a public place or landmark and will get related blog posts as a result with links to buy flight tickets or book a hotel in the nearest city.
Solution: There are three main types of image search engines - search by example, search by meta-data and hybrid search. I chose to make it search by example or so called Content-Based Image Retrieval (CIBR), which means that a user uploads a photo or image, then this image is compared to other images from the blog posts and the most similar are returned as a result.
There are 4 steps that should be done when designing and developing CBIR system:
1. Define the image descriptor. The descriptor is what you will use to descibe the image and compare it to other images. This could be the color distribution (color histogram), shape of the object(s), texture, etc. This depends on the expected results. For describing the image in our case I'm using Deep Neural Network to extract the feature vector. The model that is used is Google Landmark V2 pre-trained model.
2. Indexing the dataset. Our dataset consist of all images that are related of blog posts. Each images is passed to the DNN network and its feature vector is extracted. Elasticsearch has a dense_vector type field which we will use to store the vectors of the images.
You can read about the dense_vector type field in Elasticsearch documentation.
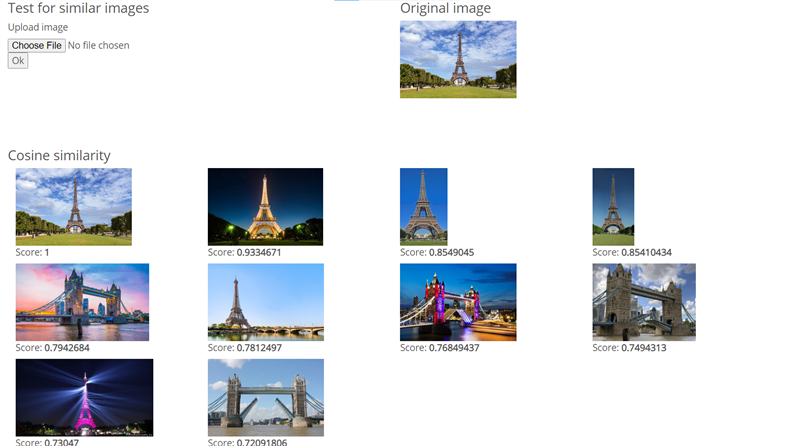
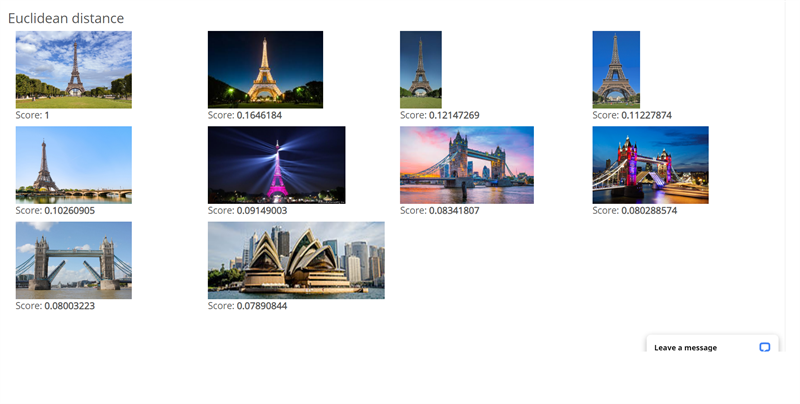
3. Define the similarity. There are different metrics that can be used for defining the similarity between images. Elastic search provides us 2 very convenient function that we can use to compare the images - Cosine similarity (cosineSimilarity) and Eucledian distance (l2norm). While both of them can be used to compare vectors I found using Eucledian distance gives better results. Cosine similarity is more suitable when you're working with text, for example.
Note: The l2norm function is available in Elasticsearch 7.x so if you are with older version you can still use the cosineSimilarity.
You can check about cosineSimilarity and l2norm in Elasticsearch documentation.
Here you can see a comparison of using both methods.


4. Searching. When the user uploads the image we're using the same DNN to extract the feature vector from it and compare it to the others stored in Elasticsearch. One important thing here is to properly define the threshold for accurate results. By trial and error I found that in my case the most accurate results are when setting the threshold to the mean of the minimum and maximum score.

As you can see AI can be widely used, even in a simple blog.
Stay tuned for other interesting use cases.
Meanwhile if you missed my last article about using face recogniton for cropping images you can read about it here:
AI Sitefinity Image Processor
Use case:
Our travel agency has a blog where trips to different places and landmarks are posted. Each blog post has title, summary, description, tags with the nearest cities and a media gallery with images from the travel.We're creating an image search engine where a user will be able to upload an image of a public place or landmark and will get related blog posts as a result with links to buy flight tickets or book a hotel in the nearest city.Solution: There are three main types of image search engines - search by example, search by meta-data and hybrid search. I chose to make it search by example or so called Content-Based Image Retrieval (CIBR), which means that a user uploads a photo or image, then this image is compared to other images from the blog posts and the most similar are returned as a result.
There are 4 steps that should be done when designing and developing CBIR system:
1. Define the image descriptor. The descriptor is what you will use to descibe the image and compare it to other images. This could be the color distribution (color histogram), shape of the object(s), texture, etc. This depends on the expected results. For describing the image in our case I'm using Deep Neural Network to extract the feature vector. The model that is used is Google Landmark V2 pre-trained model.
2. Indexing the dataset. Our dataset consist of all images that are related of blog posts. Each images is passed to the DNN network and its feature vector is extracted. Elasticsearch has a dense_vector type field which we will use to store the vectors of the images.
You can read about the dense_vector type field in Elasticsearch documentation.
3. Define the similarity. There are different metrics that can be used for defining the similarity between images. Elastic search provides us 2 very convenient function that we can use to compare the images - Cosine similarity (cosineSimilarity) and Eucledian distance (l2norm). While both of them can be used to compare vectors I found using Eucledian distance gives better results. Cosine similarity is more suitable when you're working with text, for example.
Note: The l2norm function is available in Elasticsearch 7.x so if you are with older version you can still use the cosineSimilarity.
You can check about cosineSimilarity and l2norm in Elasticsearch documentation.
Here you can see a comparison of using both methods.


4. Searching. When the user uploads the image we're using the same DNN to extract the feature vector from it and compare it to the others stored in Elasticsearch. One important thing here is to properly define the threshold for accurate results. By trial and error I found that in my case the most accurate results are when setting the threshold to the mean of the minimum and maximum score.

As you can see AI can be widely used, even in a simple blog.
Stay tuned for other interesting use cases.
Meanwhile if you missed my last article about using face recogniton for cropping images you can read about it here:
AI Sitefinity Image Processor